This recipe was submitted by one of our readers, just like you.
Easy Homemade Spelt Sourdough
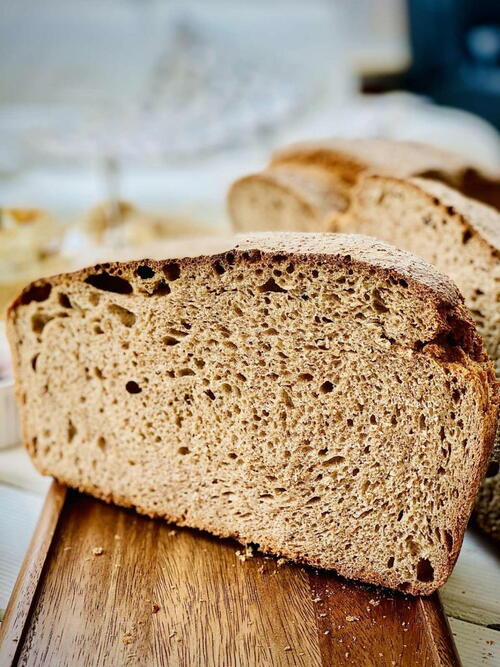
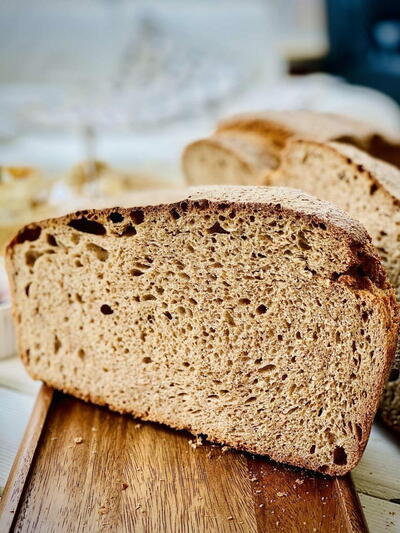
"There isn’t anything more rewarding than bread home-baking and this time I have made this seeded spelt sourdough in a dutch oven. the perfect beginner’s recipe, easy and so darn good, baked to perfection too. Ohhh, that crust! Sourdough is unique because it does not require commercial yeast in order to rise, instead, it is used live fermented culture or a sourdough starter, which serves as a natural leavening agent. Sourdough bread is definitely a healthier option to choose when opting for bread, it tastes so much better, it is pretty easy to make and so much better tolerated. "
NotesA little more about hydration
Water ratio can range between 50% ( for a pretty dense loaf) and 80% ( a ciabatta for instance). A high water ratio is essential in getting those nice big wholes in the bread also known as “open crumb”.
At first, making a dough with these high water ratios may make you think that it cannot be right and generally, bakers use machinery to ‘handle’ that annoyingly sticky and fairly runny dough. It can be done by hand too but it takes some practice to handle that dough and a good old dough scraper would be of great help.
Here’s a video that shows you how to handle high hydration dough.
Tips
To speed up the process in the winter, you can place the dough in the oven and put the oven light on or set it for 30C/85F.
Try and work with warm ingredients to speed up the proving process.
Serves20
Preparation Time15 min
Cooking Time50 min
Cooking MethodOven
Ingredients
- 700 g spelt flour or any flour or a mix you may wish to use (avoid all-purpose/bleached flour)
- 300 g wholemeal flour
- 700 ml warm water 66-70% is the ideal hydration – it always works great
- 200 g starter (a nice and bubbly one)
- 50 ml olive oil leave some for greasing the dish if you chose to
- 15 g salt I used Himalayan pink
- 1 tbsp flour for dusting
- 4 tbsp chia seeds or a mix of seeds ( chia, linseed, sunflower, , hemps and pumpkin seeds)
-
Making the dough Place the flour (both spelt and wholemeal) into a larger bowl glass or wood ( avoid metal at any cost). Mix the flour with the seeds to make sure they are well combined. Make a well in the centre, add the sourdough starter, the warm water and knead until you have a nice dough. Add the olive oil and knead a little further.
-
Cover the bowl with cling film or a clean and damp kitchen towel. Allow autolysing (to rest) for 30 to 60 minutes (it is entirely up to you). After the dough has had the initial rest, work this making it into a ball shape (whilst still in the bowl). This will take approximately 15-20 seconds.
-
Bulk Rise The dough needs to rise and this will be a slower process than the yeast made bread. Temperature is crucial to this – the warmer the quicker the process will take place.
-
Cover the bowl with cling film/wrap or a very damp kitchen cloth. Allow it to rest in a warm spot to rise. The dough is ready when it no longer looks dense and has doubled/ almost doubled in size. This can take anywhere from 3 to 12 hours depending on the temperature of your ingredients, the potency of your starter and the ambient. In the summer at 30°C or 86°F in a sunny spot rise times can take anywhere between 3-4 hours whereas, in the winter (20°C / 68°F), the dough can take anything between 9-12 hours to rise. Oh Yes!
-
Optional Step – To Stretch And Fold The Dough During the bulk rise process, you have the option to perform the stretch & fold op. This will help with strengthening your beautiful sourdough dough. You can start this 30 minutes into the bulk rise.
-
Gather a portion of the dough, stretch it upwards and then fold it over itself. Rotate the bowl ¼ turn and repeat this process until you have come full circle to complete 1 set. Do this once or twice spaced about an hour apart. Although this step is not mandatory, it will increase the total volume and height of your bread. Weird, yes, I know!! This should take a minute or two.
-
Shape the dough Remove the dough from the bowl, and place onto a floured work surface so it does not stick. You may notice that the dough will gently deflate as you fold and shape it.
-
Using your hands, gently fold the sides of the dough in and rotate it, using quarter turns in a circular motion. Repeat this process until you are happy with its giant bun appearance.
-
Place The Dough For The Second Rise Now the dough needs to rise again, but luckily it is only for 1 hour or so.
-
Coat the bottom of your Dutch oven with cornmeal, oil or parchment paper to prevent your sourdough from sticking (I do the latter). Place the dough inside for a second rise which is no longer than 1 hour and cover with the lid or, again, a very damp cloth. The dough will be ready when it is slightly puffy. this time it does not need to double in size.
-
Preheat your oven at 220°C or 425° F towards the end of the second rise.
-
Score Your Dough This step is optional but if you chose to do it, just before your sourdough goes into the oven, using a blade or a bread lame, make a cut for about 3-4 inches long in the centre of the dough.
-
Bake Your Sourdough Place the bread into the preheated oven right in the centre (leave the lid on) and reduce the temperature to 200°C or 400° F. Bake at this temperature for about 20 minutes. Remove the lid, and continue to bake (uncovered) for an additional 40-45 minutes or until your bread looks golden brown. Please do remember that all ovens are different.
-
When ready, remove the bread from the oven and cool on a wire rack for at least an hour before slicing. Don’t cut too soon or else the inside will have a gummy raw texture!
-
If you chose to freeze it, allow it to cool completely, slice and freeze for later.
Read NextGranny's Monkey Bread


